I was supposed to be on a quilt retreat this weekend that fell apart for reasons I won't disclose. That means that I have 4 days that I'd planned to be "off" to work on quilt projects. Wooo Hooo!
I'm really focused on the Monet Quilt. I made a post giving really detailed, serious tips about how this was going to work.
PPPFFFFSHHHaaaaHAHAHAHA(Snort)pshshhh [gasp] ahh. yea. Here's what it really looks like.
Center L: The partial panel that I am currently working on. The cross-stitch pattern I printed out sitting on top of the fuse-able panel. The pretty pink is a double layer wool blanket that I'm using as a pressing pad for that groovy mini iron on the right. (You can't see the burn mark under the iron where I set it down when I missed the plastic & metal stand. Nor can you see the amazing burn mark on my finger where I forgot that the wire stand would be hotter than Hades when I tried to move it.) The section I'm working on is about 1/4 the size of a full printed panel.
Oh, and did you notice that there's a cutting mat and fabric on the floor? This is my dining room. The sewing machine in in my daughter's bedroom. The family actually prefers eating in front of the TV in the living room, so I don't get complaints about taking the table out of commission for meals. I would really, really like them to eat healthy meals...so I'm focused on finishing fast.
You may have noticed the wine glass (Lower Right). My find of the day is Tamas 07' Zinfandel (Livermore CA). Yum. I found it at Fred Myers, on my way home from the LQS. I've been drinking Shiraz Fosters Lager in honor of the Joseph's Coat Quilt Along....but it's time to support my regional vinyards.
You know how great it is to have a friend who always watches your back? I have several quilter friends who fit that description, but there is also one LQS. I should note that I am completely spoiled. I have a dozen quilt shops that I support, but one that I depend upon when I can't find what I need any where else. Today, I was able to find replacement fabrics for the ones that were not working for me on the Monet quilt. The good news for all my out-of-town friends, is that they are on-line, as well as brick-and-mortar. I'm giving an unsponsored shout-out to Quilt Expressions. Karen has the best collection of batiks that I've experienced in the Inter Mountain West. That's how I rate quilt shops, but for the rest of you she has all the best designers (including Kaffe for you addicts.). I went today to find some new greens, and replaced several in the Monet quilt.
Friday, May 14, 2010
Lady (Partially Dressed)
Squint a little. (or take off your glasses if you're near-sided). Must keep positioning blocks while my enthusiasm for this project is high.
Thursday, May 13, 2010
Lady with Parasol
I'm feeling much better [cough]. Thanks for asking [sniffle, cough]. However, yesterday when I was confirming my Thursday schedule, I must have sounded like hell because my colleague offered to reschedule all my clients. So it's another day of quilting for me [hack, hack, cough, groan].
The Lady is shaping up nicely. I found some greens in the stash to replace the ones that were too blue. The missing pieces are all supposed to be the blue/tan fabric that's in the bottom 3 rows, but I don't have enough so I may substitute a similar fabric in the sky sections. (If I could remember where I bought it...I would buy more since I'm pretty sure I bought it at one of 6 quilt shops in the 20 mile radius.)
I'm going to start a list of lessons learned to share with anyone else who is crazy enough to try this...also to serve as notes to self if this turns out well enough I want to attempt another.
1. Before ordering fuseable interfacing, double check the number of squares per panel. (I mis-read the 24x24 inches as being 24x24 squares...they are actually 15x23 squares.)
2. The time spent counting up the total numbers you need of each of the colors is time well spent. For 1.5" squares 1/8 yard = 75, 1/4 yard = 150, 1/3 yard = 200.
3. I cut down sticky notes to 1/4" strips and wrote the numbers of the colors I needed. Those were then stuck to the color key so I knew which colors I was looking for. As soon as the fabric was cut, I pinned the number onto the fabric. When the sticky notes are all off the key...you have all the colors you need!
4. Be cautious about batiks. A color wash that has an overall blue feel to it may look purple or tan when cut down to 1.5".
5. Before cutting fabric, organize the stacks based on the names of the colors (i.e. Olive Lt, Dk, VyDk) and reorganize as needed.
6. Cut all your fabrics into the number of strips that you estimated that you'd need (1 strip = 25 1.5" squares). Cut some of them into 1,2 and 3 block sizes. The floss organizer works really well. When you are ready to use one color, pull out all the fabrics and the identifying label at once and replace them as a unit when your are done. Keep a small cutting board handy so you can cut more of the sizes you need from the full strips as needed.
7. Buy or borrow a mini-iron (mine is a Mini Iron II by Clover, purchased with a 40% off coupon at JoAnne's.)
8. A wool blanket folded in half has worked well as an ironing surface large enough for a panel.
9. Trim the edges off the pre-printed panels. Also, consider cutting panels into smaller pieces. I could easily reach across 10 squares, but when I used a full panel, I had to stand and hover to reach the top rows which caused my back to protest.
10. Work in a cat-proof space. (If you've ever worked on a jigsaw puzzle in a house with a curious cat...you know what I mean.)
11. Don't iron the pieces down until the whole panel is placed. (This morning I was 3 spaces off on the right 1/3 of the panel, ugh.) Tip #10 is critical to success on # 11.
The Lady is shaping up nicely. I found some greens in the stash to replace the ones that were too blue. The missing pieces are all supposed to be the blue/tan fabric that's in the bottom 3 rows, but I don't have enough so I may substitute a similar fabric in the sky sections. (If I could remember where I bought it...I would buy more since I'm pretty sure I bought it at one of 6 quilt shops in the 20 mile radius.)
I'm going to start a list of lessons learned to share with anyone else who is crazy enough to try this...also to serve as notes to self if this turns out well enough I want to attempt another.
1. Before ordering fuseable interfacing, double check the number of squares per panel. (I mis-read the 24x24 inches as being 24x24 squares...they are actually 15x23 squares.)
2. The time spent counting up the total numbers you need of each of the colors is time well spent. For 1.5" squares 1/8 yard = 75, 1/4 yard = 150, 1/3 yard = 200.
3. I cut down sticky notes to 1/4" strips and wrote the numbers of the colors I needed. Those were then stuck to the color key so I knew which colors I was looking for. As soon as the fabric was cut, I pinned the number onto the fabric. When the sticky notes are all off the key...you have all the colors you need!
4. Be cautious about batiks. A color wash that has an overall blue feel to it may look purple or tan when cut down to 1.5".
5. Before cutting fabric, organize the stacks based on the names of the colors (i.e. Olive Lt, Dk, VyDk) and reorganize as needed.
6. Cut all your fabrics into the number of strips that you estimated that you'd need (1 strip = 25 1.5" squares). Cut some of them into 1,2 and 3 block sizes. The floss organizer works really well. When you are ready to use one color, pull out all the fabrics and the identifying label at once and replace them as a unit when your are done. Keep a small cutting board handy so you can cut more of the sizes you need from the full strips as needed.
7. Buy or borrow a mini-iron (mine is a Mini Iron II by Clover, purchased with a 40% off coupon at JoAnne's.)
8. A wool blanket folded in half has worked well as an ironing surface large enough for a panel.
9. Trim the edges off the pre-printed panels. Also, consider cutting panels into smaller pieces. I could easily reach across 10 squares, but when I used a full panel, I had to stand and hover to reach the top rows which caused my back to protest.
10. Work in a cat-proof space. (If you've ever worked on a jigsaw puzzle in a house with a curious cat...you know what I mean.)
11. Don't iron the pieces down until the whole panel is placed. (This morning I was 3 spaces off on the right 1/3 of the panel, ugh.) Tip #10 is critical to success on # 11.
Tuesday, May 11, 2010
Starting the Crazy Project
Well, the head-cold status has moved from "Wretched" to "Rotten". I'm trying to wean off the meds as I feel that I'm existing in a world between "Fantasia" and "Matrix". I took another day off to recover, but decided to live dangerously...using both irons and rotary cutters. The risk paid off and I got much done (and no band-aids).
I spent Mother's Day sorting and double checking my fabric selections against the DMC Needlework Threads Color Card. You see...this crazy project involves converting a cross-stitch pattern into a quilt. Since I'd been collecting the fabrics over 1 year and 12 quiltshops, some of my choices needed to be re-arranged to make a better color blend.
Then I started cutting 1.5" strips, which in turn were cut into 1.5", 3" & 4.5" pieces. Then shoved into an embroidery floss organizer. The yellow cardstock labels have the symbol, color # and color name written on them, in the hopes that I can keep this all straight. I cut the greens on Sunday, and enough of the blues to do the fussy sections.
Here's the pattern and calculations that I've been dragging around with me. The whole cross-stitch is 118x148. Since I'm using a 1" finished square, I'll need to crop the sides and bottom of the pattern to a rational quilt size. My original planning was 72x96, but I've already decided that I need to include more of the bottom of the picture. Will just have to work that out as I go. Oh, and don't be concerned by the printout colors, my printer ink was running out that day. Monet's painting is really blue & green.

You'll have to use your imagination on this part. The upper green is part of the parasol. The lower green blob is the upper part of the woman's face. The blank spaces are 2 shades of green that were completely wrong, and a shade of blue that I didn't have enough of (thanks to the re-arrangement of colors...see paragraph 2). These are all fused to a printed interfacing made by Quiltsmart. Unfortunately I misread the panel size as being the number of squares. I'm saving the panels for the detailed sections of the woman and the boy. I hope to get lots done on this quilt over the next couple weeks to keep me motivated to finish.
I spent Mother's Day sorting and double checking my fabric selections against the DMC Needlework Threads Color Card. You see...this crazy project involves converting a cross-stitch pattern into a quilt. Since I'd been collecting the fabrics over 1 year and 12 quiltshops, some of my choices needed to be re-arranged to make a better color blend.
Then I started cutting 1.5" strips, which in turn were cut into 1.5", 3" & 4.5" pieces. Then shoved into an embroidery floss organizer. The yellow cardstock labels have the symbol, color # and color name written on them, in the hopes that I can keep this all straight. I cut the greens on Sunday, and enough of the blues to do the fussy sections.
Here's the pattern and calculations that I've been dragging around with me. The whole cross-stitch is 118x148. Since I'm using a 1" finished square, I'll need to crop the sides and bottom of the pattern to a rational quilt size. My original planning was 72x96, but I've already decided that I need to include more of the bottom of the picture. Will just have to work that out as I go. Oh, and don't be concerned by the printout colors, my printer ink was running out that day. Monet's painting is really blue & green.
You'll have to use your imagination on this part. The upper green is part of the parasol. The lower green blob is the upper part of the woman's face. The blank spaces are 2 shades of green that were completely wrong, and a shade of blue that I didn't have enough of (thanks to the re-arrangement of colors...see paragraph 2). These are all fused to a printed interfacing made by Quiltsmart. Unfortunately I misread the panel size as being the number of squares. I'm saving the panels for the detailed sections of the woman and the boy. I hope to get lots done on this quilt over the next couple weeks to keep me motivated to finish.
Monday, May 10, 2010
Safe Quilting
Interestingly, the cold medicine I'm taking fails to warn about cooking under the influence. Fortunately, I only burned one side of the grilled sandwich.
Faced with that reality check, I thought it was in my best interest to avoid anything sharp or hot during my afternoon of sick leave. Ruling out irons, rotary cutters, good scissors, pins and needles was a bit of a challenge. Eventually, I opted for paper scissors and glue. I still have all my fingers, and a good start on the hexagon quilt I'll be sewing on the Epic Road Trip of 2010.
I finished cutting out about a thousand little hexes that I had printed out on scratch paper. I was somewhat concerned since the only times I've done English Piecing, I've used cardstock and basted the material in place. I managed to successfully used the gluestick approach and though the paper was flimsier than I'm used to, I think it'll work fine since I don't plan to re-use the papers (hence the scratch paper). 68 glue-basted, 984 to go.
Saturday, May 8, 2010
Garden of Stitches - The Ashley Quilt
Hurray! I'm done!!!
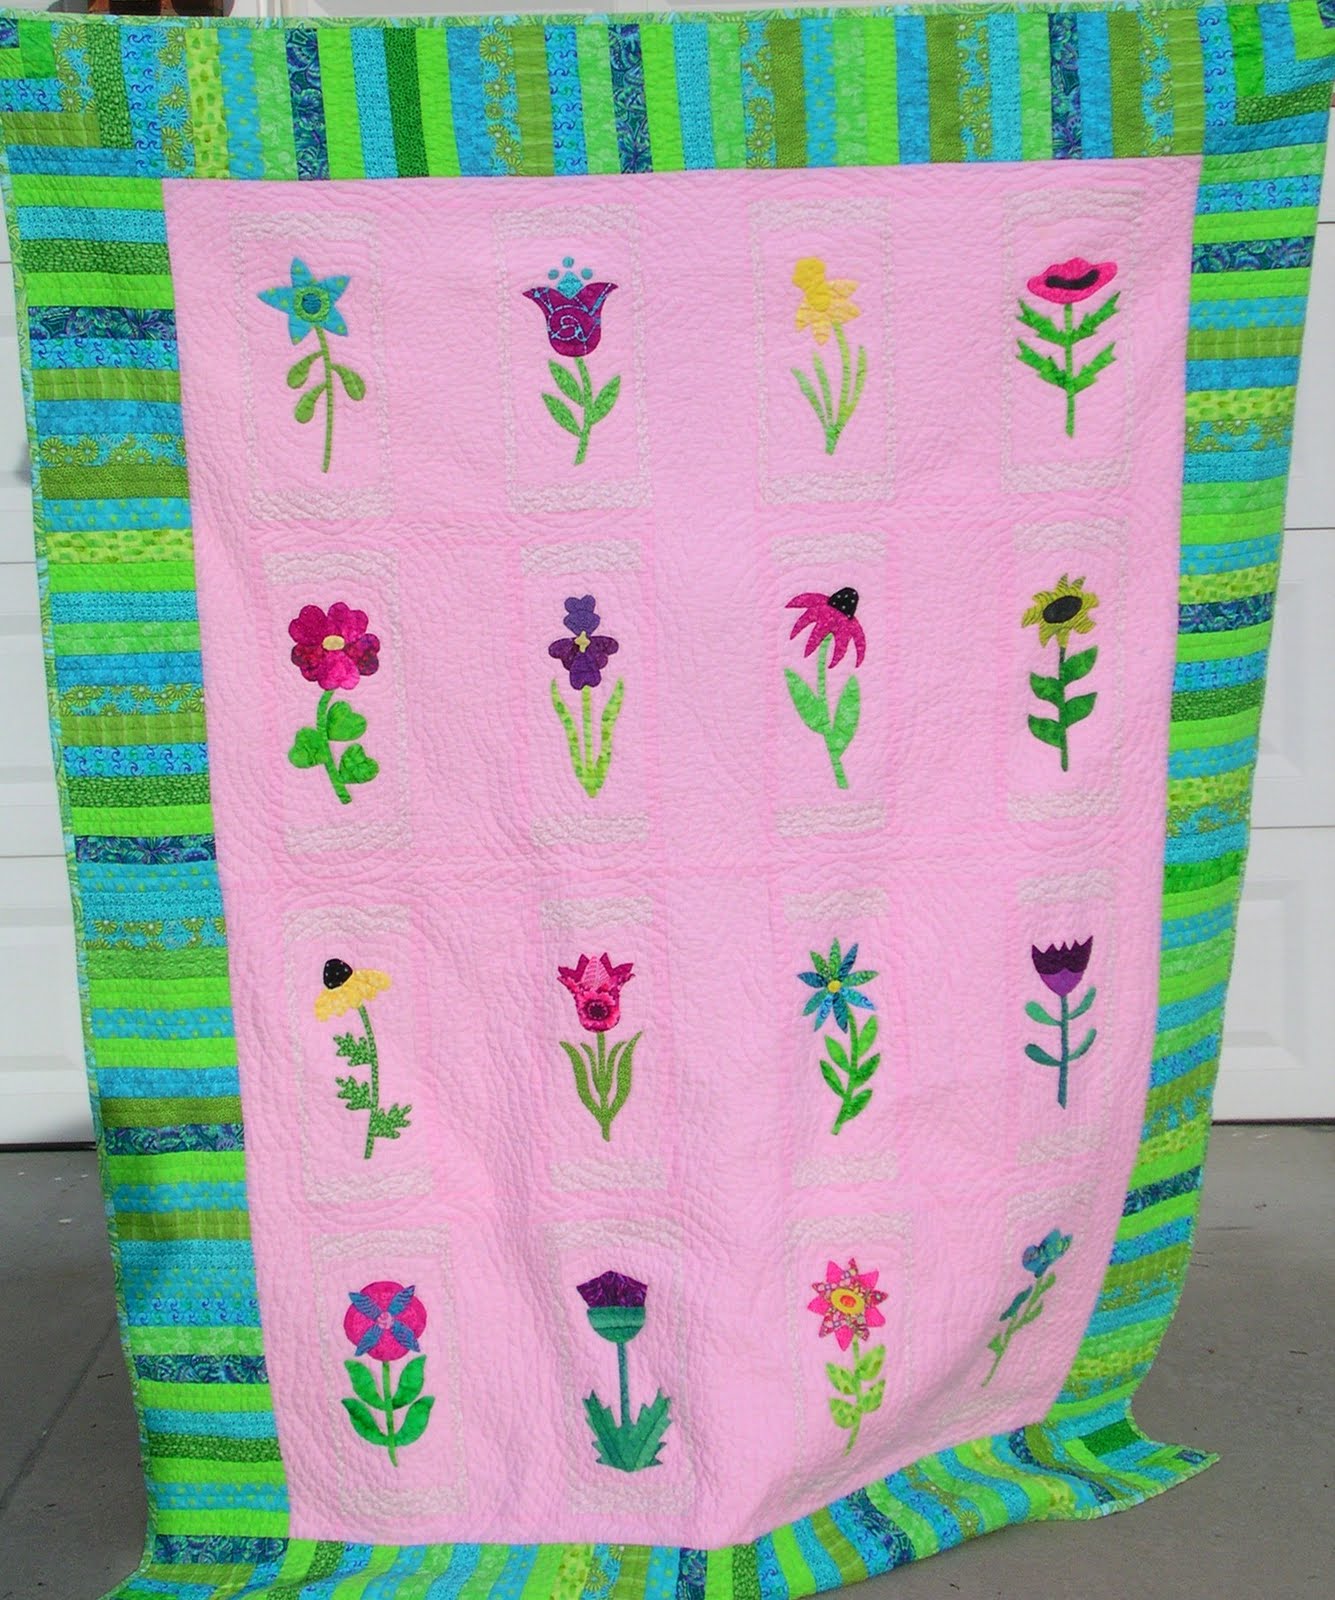
So here's the whole story on this quilt. There's a quiltshop in McCall (Huckleberry's) that years ago only carried what I consider "muddy colored" fabrics. (They've expanded a little in recent years, but still love earth tones.) They had Garden of Stitches by Lisa Bongean displayed. I loved the shape of the flowers and bought the pattern with the plan to make it in bright colors for my younger daughter. The next spring, a family member was diagnosed with cancer and I spent a lot of time waiting in doctor's offices. This became my waiting room project and for a time I referred to it as "the chemo quilt". Meanwhile, I finished 2 quilts for the daughter, so the need to finish this one was eliminated and it remained a work-in-it-whenever project.
Then in 2009, I decided to make quilts for each of my nieces and nephews with a self-imposed rule that they had to be made with "stash" material. Fortunately, my niece Ashley liked the colors I was using for this quilt and it became hers. The applique was nearly done, but last summer I had to figure out how to piece it together from the stash. I decided that the half-square triangles in the original pattern were too busy and distracted from the applique. I framed the flowers with a pink print that is not noticeable from a distance, but makes a subtle frame on close inspection. Which is a good thing b/c I ran short and had to make some adaptations. I also am not a fan of scrappy quilts (they make me anxious for some reason), so I set about taming the outer border to just 2 colors. My other challenge was how to quilt it. With all that pink space b/w the flowers, I felt it needed a lot of interest, so decided on echo quilting. That decision then creates a new problem in that lap quilting works best. But it was summer. So I tried something new. I sewed the quilt into 4 panels, quilted those up to 2" from the joining edge, then sewed them together and quilted using the approach used for Hawaiian style quilting.
The other interesting story that goes with this quilt revolves around a quilt retreat in June 2009. Joanne invited several of us to her cabin the week of the Council, ID quilt show. The evening before the luncheon, I was working on this quilt and trying to convince Diane that she'd like applique if she just tried the back-basting method. She agreed to try and was working on a flower from this pattern to add to the back of a quilt she'd planned to finish that week. We got to the luncheon. I hadn't paid any attention to who the speaker was since I don't know any quilt designers. As I was looking over the display table before the trunk show...I had to laugh. It was Lisa Bongean, the designer of the flowers we'd been working on.
Labels:
Garden of Stitches,
Lisa Bongean,
Scrap Border,
Stash
Sunday, May 2, 2010
Stash Refill
I was also keeping an eye out for pink & green batiks to go with my summer road trip project:
I found a great historical quilt on the Quilt Index made in 1880, that I thought would look fun and modern in this color-way.
I've been periodically cutting out the raspberry & lime hexes and organizing them in baggies. I'm using a shower curtain ring to hold the bags together. After trying several different hex patterns on line, I found that the one at The Sometimes Crafter best met my needs. She also posted some links that got me thinking....in the interest of time, I'm going to try glue stick instead of basting all this fabric onto the papers. I will probably regret it later. I decided to trim up all of these using a hex ruler rather than the tutorial's squares approach. I may hand quilt this later, and having predictable seams will keep me from going crazy. I just realized that I used the teal that I'd planned for this quilt on the Joseph's Coat. Hopefully I can find something in these colors at the store. (Teal/blue is so tricky to match with colors changing annually).
My other brilliant plan came to me last week while riding on the back of the Harley. I usually buy 1/8 yard cuts of batiks that I simply love but have no specific plan for. And I was thinking about a post on Stash Manicure that had to do with cutting and organizing fabrics into charm squares and jelly rolls. It occurred to me that if I bought a 1/3 yard of Irresistables...I could cut a 2.5" strip, a 5" strip - to be cut into charm squares, and I'd still have about an 1/8th left. Then I can organize the squares into stacks and come Christmas time, I have great presents for my quilter friends. I was so excited about this idea, that I started cutting my Joseph's Coat fabrics that were large yardages into squares and I have a head start on gifts! So many bloggers do give-aways to celebrate blogging anniversaries...Hmmm maybe I should do that too. Anyone interested in winning batik charm squares?
Subscribe to:
Posts (Atom)