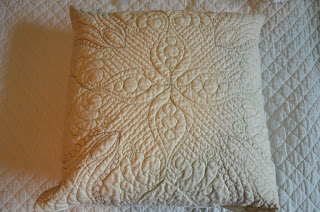
Technically, I could call this trio finish 4,5,6. But the real point was to turn orphan blocks into throw pillows.
This was the mosaic test block. I used a fusible web and cut pieces about a cm in size. They did not stick well, with tons of them falling off as I was trying to stitch them in place. I decided to wash this before I turned it into a pillow. That required my going back and re-sewing about 20% of the seams. I am glad that I didn't start with the original plan to make a portrait in the style of St Sophia's in Kiev, Ukraine. Instead I have 1 creepy Carol eye staring at me. This also took longer to turn into a pillow as it was already bound, so I hand stitched on the backing to protect the integrity of the finished piece.
This was a test block for the Tumbleweeds quilt. I designed a fairly elaborate quilting for an oversized Ohio star. You can see that quilt here.
And this was the test lay out for the Desert Rose quilt which I am almost finished hand quilting. This post has the quilt during the piecing process. The color scheme reversed with blue stars and dark green outers. Glad all that was decided before I committed to buying the fabric.
Next on the horizon is the Dragonfly Challenge pillow case. The quilting is done and I just need to make and add the back.
Saturday, March 31, 2018
Wednesday, March 28, 2018
Dragonfly planning
I printed a copy of the inspiration dragonfly. I marked out a grid. This is 8x7 whatevers. Depends on the size you are aiming for. I guess this is geometry in the real world. Still don't get algebra.
I drew out my grid including 1/2 whatevers and started connecting the dots.
And now the fun begins. Filling in the bits with the same fill as the original. I have plans for both applique and quilting only. My design size is to fit a conventional pillow case as that is a size I can always use.
I drew out my grid including 1/2 whatevers and started connecting the dots.
And now the fun begins. Filling in the bits with the same fill as the original. I have plans for both applique and quilting only. My design size is to fit a conventional pillow case as that is a size I can always use.
Dragonfly Challenge
I am issuing a challenge to all my crafty friends. Adapt this Johanna Basford image to your medium. Copyright ok for personal use. Quilt, appliqué, quill, crochet, scrapbook, paint, woodcut.
Deadline is Oct 20. Any medium. Ok to submit more than one. No rules. And I will come up with some kind of prize, depending upon who plays. Probably food gift certificate because who doesn’t love to eat?
And just a reminder. Dragonflies don't have antennae.
Deadline is Oct 20. Any medium. Ok to submit more than one. No rules. And I will come up with some kind of prize, depending upon who plays. Probably food gift certificate because who doesn’t love to eat?
And just a reminder. Dragonflies don't have antennae.
And a reminder from the artist's studio:
"If you are using Johanna’s designs on your creations and keeping them for personal use we do not have an issue with this, we love seeing everyone’s personal projects and the unique ways which so many artists and craftspeople interpret Johanna's drawings.
We do however need to make you aware that our publishers are very strict when it comes to enforcing copyright law if the artwork is used on a commercial application, so you can not sell any of your work featuring Johanna’s designs.
What this means is, if you are selling the objects you have created that feature Johanna’s artwork, then the publishers may begin legal action against you. We just want to make you aware as we really wouldn’t want you getting into any trouble!
If you are making the objects as gifts or just for yourself and sharing images online etc, then this is just fine – we LOVE this!! "
Tuesday, March 27, 2018
Finish 3
Last fall, my friend Katy asked me for an idea for using some Jelly Rolls. I had been collecting ideas, but not actually done any. I started this design. Tutorial Here. So I finally got around to finishing what I had cut out, then added a 5" dark green border to anchor it.
I stitched in the ditch on the white. Then decided it needed more interest so I added 2 more lines of stitching also in the white.
I haven't done a self binding for a really long time. And now I'm wondering why. It went quickly and the finish was so much better than 95% of the machine stitched bindings I have done.
I did the binding first, thinking it would be easier to get straight. Then I went back and filled in the outer border with feathers. I learned that I do best by sewing one side of the feathers at a time rather than trying to alternate right and left.
Washed and dried before I went to bed and officially finished!
Sunday, March 25, 2018
Finish 2
The next round of finishes are boring but super functional. My hot pads were starting to fall apart and need replacement.
In the pile of UFOs was a large rectangular panel that was a quilt as you go test.
I cut it in half and added binding also from the "leftovers" bin.
There's only one layer of cotton batting, but they are big enough to fold in half if I was grabbing something very hot or very heavy.
My kitchen has dark green counters and yellow paint. So I cut a 9" strip of a wonderful yellow fabric, and one from a coordinating fabric. I added 2 layers of cotton batting. FMQ, then surged.I might go back and add binding. Or I may not. This is all about function.
A useful finish and used up an orphan block and scrap batting.
Saturday, March 24, 2018
Finish Time
I am finally, and completely an empty nester! I have spent the past month reclaiming and reorganzing space so both the hubby and I have hobby space as well as a genuine guest bed. Unfortunately, I realized that I don't have space to put away all my quilting and sewing stuff, so I am back on a finish streak.
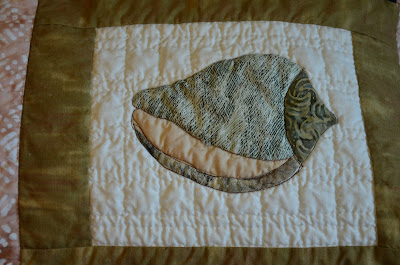
One of the UFO bins was for a sea shell applique quilt that I had designed and started over a decade ago. The original design had 30 shells in 8 different shapes and sizes.
One of the UFO bins was for a sea shell applique quilt that I had designed and started over a decade ago. The original design had 30 shells in 8 different shapes and sizes.
The bin included 3 dozen very textural fabrics like these.
Plus a couple of sea shell identification books.
While I still love this idea, I'm a mountain, not a beach girl.
So the 3 finished and one nearly done block became a pillow case.
Most of it is machine quilted, but I had to hand quilt the shell backgrounds to get the texture I wanted.
Zebra Auger
Cowrie
Leopard Scallop
Textile Cone
And this bin is ready to transition from "Seashell UFO" to an expandable applique library.
Subscribe to:
Comments (Atom)


