Monday, April 30, 2018

Popsicle Quilting


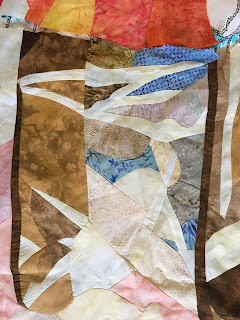
A week ago, my Tuesday staff meeting got cancelled so I got a bonus afternoon of sewing and finished the piecing on the Popsicles quilt.  I spent the next couple evenings trying to square up the edges and contemplating borders. I had planned on adding more white applique highlights, something I forgot about the evening I was motivated to sandwich the quilt.


I was envisioning Blue-Fuschia-Peach.
I had the blue and fuschia in the stash.
Peach was missing and problematic.  This was to pale to give contrast to the pale sections.


 So off to the quilt shop.   But nothing in the tone I envisioned.  These were the only peaches that weren't super pale, and then the contrast of the fuschia disappeared.

 I played with lime as an inner border, but it seemed too yellow compared to the others.
 In the end, I swapped the Fuchia for a purple that ends up looking black, brown or magenta depending upon the light.  I was very concerned about the outer edges flaring too much b/c of the bias edges.  I also got excited about a time saving idea, that in the end added 1.5 hours of ripping and re-sewing.

Surveyed the thread stash and found that I had 70% of what I needed.  My friend Beve dropped by with some of the missing colors for the outer borders. 

 So far, I have 2 session of quilting.  Round 1 was stitching in the ditch to outline major sections to help stabilize the quilt, get rid of the pins and figure out how I'm going to manage all the puckers.  The upper photo is 2 hours worth of FMQ.  Below is a close-up showing where I'm trying variations to thread color and density of quilting to try to make some highlights from the original painting.


And the final picture in this round is the quilting from the back.  About 5 hours total so far.

Wednesday, April 18, 2018

Popsicle WIP


 I made progress over the weekend.  I did complete the joining center section of the orange popsicle and joined all the parts that I had previously completed for the lower left third of the quilt.  There are definitely some bumps and puckers that even copious amounts of spray starch and an iron didn't fix.  Will have to quilt them out.
 I already had the red popsicle, and a couple lower triangles of details done.  I added the stick & shadow, the blue filler with the melty look, and finished  a cartoon panel. Auditioning tie-dyes for the upper filler sections.
I am particularly pleased with the fussy cut hair on both of these characters. 
And I'm more than a little amused at how much time I put into replicating what probably took just a few minutes for the artist to create. 

Saturday, April 14, 2018

Popsicles UFO

 I started this quilt 8 years ago.  It is Terrece Beesley's " Popsicles Momsicles" watercolor.
I was pondering why something I love so much became a UFO.   I think I know the answer.
 1) Size.  This is roughly 70" square.  Working on the outer edges is pretty easy, but when it comes to the center, both pattern pieces need to be taped together and the only place big enough is the living room.  Taking up a public space for an extended period of time, removed from the sewing machine, was a barrier.
 2) Technique.  When I started this, it was my plan for all the linear section to be pieced. This involved a lot of very fussy tracing and piecing to try to exactly replicate the original.  You can see that in the photos above and below.  Which is weird b/c I like to applique, and there are many other finished details that are applique.
 Last time I worked on it (a year ago?), I did let go of the original technique and started focusing on capturing the intent of the details instead.  The upper raspberry popsicle was focused on piecing to capture the shading, and applique for the shape.  I'll finish the orange popsicle now by making it in big chunks of orange and going back to applique the white reflections.
Good news is that my machine quilting skills have improved over this 8 years, so I am really looking forward to quilting it, and now have the ability to add a very interesting layer of quilting texture that I think will improve the finished piece.  I'll keep you  posted.

Monday, April 9, 2018

Finish 6

 Pulled this out of the drier before I went to bed and I am totally chuffed about the texture.  The front is batik.  The back is a Moda cotton and the batting is Nature's Touch Cotton.
 Machine quilted on my Singer with a mix of cotton and poly threads from the stash.
I'm getting pretty good at feathers now.
 The pattern started out as The Three Dudes Quilt.  Video Tutorial here.  However, I was making it on a day I was watching baby.  I got distracted and missed one of the dark blue strips on the stripset.  A mistake I didn't discover until all the blocks were cut.  So it's kind of a 2 1/2 Dudes quilt. 
 Just a warning if you decide to make this quilt, the cutting process gives you a lot of bias edge squares.  I found that even being super careful, my quilt flared on the outer edge.  I ended up taking a couple darts on the outer border to help square things up. Dense quilting on the outer border also helped.   You can see how ripply the edges are in my September post at this link. 
The backing is some Moda pink prints that I bought on sale on line.
And the color catchers really did their job.  I think a lot of the darkness  is from Crayola Washable markers I used to mark the quilt since I used the grey, blue and black markers due to the darker color fabrics.

I am hoping to post another finish soon.  I am only a few hours of hand quilting and a binding away from finishing the Desert Rose quilt.

Monday, April 2, 2018

Nancy's Tutorial

Nancy asked me yesterday how I would transfer the dragonfly pattern for a placemat idea that she had.  My answer was to use template plastic for each of the wing components and then use a fusable web to attach them, finishing with a satin stitch or raw edge stitching.  She had never heard of template plastic.

In the middle of the night I awoke with this idea:

 Print at least 2 copies of the dragonfly on cardstock.  Use an exacto knife to cut out sections of the design.  Save the cut outs to use as patterns as well.
 I pulled out a sampling of black and white prints that reminded me of dragonfly wings.
 Use the cutouts to audition fabrics, either from your stash or at the store.
 Alternatively, you could find one fabric that looks like dragonfly wings, like these 2 batiks.
In that case, I'd cut this out as a wing template and a body template.
But personally, I would do these 2 sections in a contrasting fabric to add more interest.


Sunday, April 1, 2018

Finish 5

 The goal of my finish streak is to clear the UFOs.  But I had to take time out to do the dragonfly challenge.  Here is the final pillow case.
 I drew the design onto my muslin fabric using Crayola Ultra-clean Washable Markers.  These have been my go-to marking pen for the past couple years and I love them! Two different decisions I made in the sandwiching.  1) I folded the fabric in half on the upper edge with the batting between to have a finished pillowcase opening.  2) I used 2 layers of batting, 1 bamboo and 1 wool.  I wanted to try some extra loft.
 I decided to do some of the background fill first.   I felt that might hold the batting more securely.  I also thought that it would make the background lines straighter if they were drawn and applied before the dense quilting on the dragonfly.   I used the walking foot and altered directions, as there is still some bunching/gathering that goes on with that foot.
Here's a shot of the micro-quilting from the back side.  The body is 1" wide and the widest section on each wing is 2".  I used Sulky viscose embroidery thread (with an embroidery needle) for the top thread on the dragonfly.  The rest was regular cotton thread.  
The extra batting and the embroidery thread combo took a lot longer for me to get into a groove on the stitching.  It didn't move as smoothly under the needle as I had hoped.  I powered through.  I finished the background lines using the free motion foot, figuring the wobbliness would disappear with washing.  

Picture above is before washing. 
Below is after washing. 

I will be adding this to the Dragonfly Challege page.  There's a link on the upper right of my page you can use in the future to check on any completions that are submitted.