When I scheduled time off for the holidays back in October, I imagined a week of sewing projects.
Instead, I got to wear my Naughty Pirate Boots to a Christmas party.
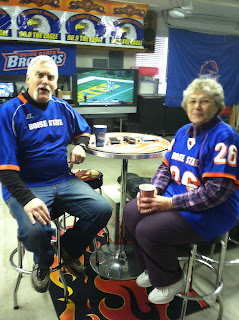
Watched the Boise State Bowl game with my husband and mom at Jack's Man Cave Garage.
Since my brother was coming, I made plans to paint the kitchen. He has a long standing tradition of planning home improvement projects when siblings show up at his house. Turn about is fair play. This is him trying to teach my husband how to make Grandma Rudolph's Eggnog.
Which coincidentally matches the color of the new kitchen.
He also made hummus...which also matches the paint.
It took 2 coats of primer to cover the dark green, so I'm quite pleased that we got this done in 3 days (with plenty of time off to eat and drink while waiting for paint to dry.)
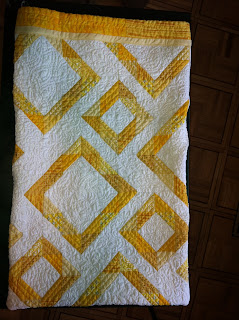
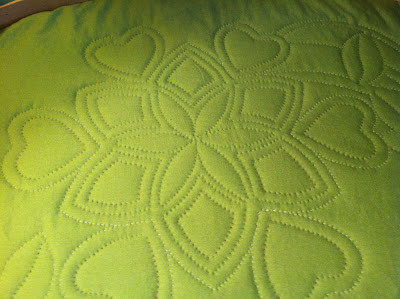
The yellow pillow cases that I didn't quite finish were supposed to go home with Larry. Here they are a day late.
Inside each square is a different free motion filler design. This includes McTavishing, Matrix, Echo Arches, Swirl, lines & pebbles and a squarish stippling. Paisleys (my favorite to do) between in the sashing.
The back side has some of the same patterns but every-other strip left un-quilted.
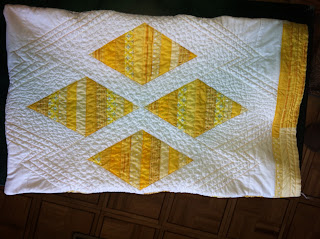
Case 2 is a continuation of the design of the other so it coordinates but is not an exact match to the other.
The band at the opening are long strips with straight line quilting.
Back side has Matrix on the right and left point, and Pebbles on the top and bottom, surrounded by a few rows of varigated yellow straight line stitching.
My intention is for the cases to hang out with this quilt, which was Di's "Bride's Quilt".
Rumor has it, however, that she has been "saving" this quilt not using it. Bad Girl. This is a utilitarian quilt made to be used. Machine wash warm and tumble dry. If you wear it out, I promise to make you a replacement.
Monday, December 31, 2012
Monday, December 17, 2012
Quick Update
I managed to finish one corner of the quilt with the new fill. Gave it a quick spritz to remove the marking lines as I was desperate to see what it was going to look like. The good news is that I like it a lot. It adds a great deal of interest to the big blank areas where I was forever tempted to add more applique. The bad news is that it's a lot of stitching and with the dark thread, every wiggle and wonky stitch is visible. But I'm not going to worry about that since you can't really see the stitching unless you are a foot away.
Sunday, December 16, 2012
This and That
I have the straight line stitching done on what will become 2 pillow cases. Next step is FMQ...still deciding which fills.
And after much debate and multiple patterns drawn and erased, I finally committed to a background fill for the Heart's Infatuation quilt I opted for a Sashiko inspired diamond quilted with magenta thread on the white background. As you might guess from all the extra lines, that was a last minute change after I had started with a triple line grid. Hope I don't regret that later.
Talked with my mom last night and she is thinking that her next international trip (she takes 2 a year) may be to return to Australia. I tried to convince her that I am well known down under (to certain blog reading quilters) and should go with her. So...when should we go? Spring or Fall?
Saturday, December 8, 2012
Panel 1
This is not moving as quickly as I'd like, as the head cold I am fighting is making me a little fuzzy. A half gallon of herbal tea, a couple adult beverages and a lot of sleep seems to be holding it at bay.
But on the other hand, this error (of course it was right in the CENTER of the panel) supports the theory that I'm less than 100%. I managed to knock about 10 blocks off the design wall while I was removing them to sew and it appears I'm not as clever as I think I am.
Friday, December 7, 2012
Teaser
I have managed a week-day off with the house to myself. I have most of the chores done and I pulled out those HST I posted about last week.
I used some thumb tacks to put a piece of flannel up on the wall so I actually have a piece of "design wall" instead of "design floor". It's about 4" too narrow for this project...but still...
This is a variation of the layout that I used for my Citrus Squares quilt which was in turn a variation of Jackie's at Canton Quilt Work.

And I am still quilting away on the Hearts Infatuation.
Progress is easier to see on the back side.
Unfortunately, I feel a cold coming on.... may not have any progress to brag about this weekend.
I used some thumb tacks to put a piece of flannel up on the wall so I actually have a piece of "design wall" instead of "design floor". It's about 4" too narrow for this project...but still...
This is a variation of the layout that I used for my Citrus Squares quilt which was in turn a variation of Jackie's at Canton Quilt Work.

And I am still quilting away on the Hearts Infatuation.
Progress is easier to see on the back side.
Unfortunately, I feel a cold coming on.... may not have any progress to brag about this weekend.
Sunday, December 2, 2012
HST
I know that I said I was working on finishing up UFOs. But my brother is coming to my house for Christmas. He's one of those people that you can't buy anything for because he just buys what he wants when he wants to.
I cut strips 3" wide in yellow and misc white on white fabrics. I marked them with 3" squares and one diagonal line.
Then I sewed 1/4" on either side of the line.
My dad used to always point out that you figure out the best way to do a project just as you are finishing up. I was pretty pleased with myself when I figured out about a quarter of the way in that I could line up several strips at a time and sew across all of them.
I found that it worked best to work on 2 sets at a time so I didn't have any thread tails (left one set on the machine while I positioned the other). It would probably work even better if all the strips were the same length, but I was using stash fabrics.
I know that there are people who like getting into a rhythm with piecing. I'm not one of them. I hate piecing.
One thing I have learned, however is how critically important pressing is. Time spent pressing at every stage of the sewing process saves me hours of angst and disappointment later.
I am also a trimmer. My lack of patience at the machine can be fixed with a rotary cutter. The formula for HST is 7/8" larger than your desired finished size. For example, if you want a 2" finished square, you would start with a strip 2 7/8". I add 1" and make my diagonal line stitching at a scant 1/4" so I have wiggle room for trimming to 2.5".
It's a little more waste, but worth my sanity.
I'm about half way finished with the trimming.
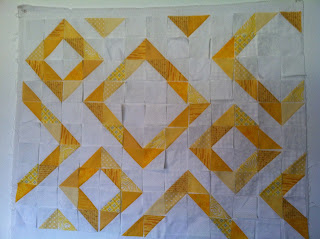
Here's a hint about what the finished product will look like.
Friday, November 30, 2012
OOORah!
A quilt top finish!!! And it comes with quite a story. I started this quilt for a wedding gift for a Marine who was about to be married and had a wonderful love story that made me melt. I had some red fabrics in my stash and immediately started on this quilt with grand plans for it to be a wedding gift. I lost my momentum. I missed the deadline.
It had been a great plan. Scarlet and Gold are the colors for the US Marine Corps. By keeping the ring sections solid red (compared with a traditional Double Wedding Ring which has pieced ring sections) I thought it would look more contemporary, perfect for a young couple.
Determined to finish up some UFO's, I pulled this out recently and had to make decisions.
1) I could abandon the project since the event was past.
2) I could finish it and find a different recipient.
I spent Thanksgiving Weekend making "melons" to finish this quilt. It is a throw size quilt - about 58" x 68".
Now I have a fantastic flimsy that I want to use as a fundraiser quilt. The groups that I have in mind support injured/killed police & fire fighters or missing soldiers.
So quilters....how much would you pay for a chance at this quilt?
Sunday, November 25, 2012
A break from quilting
My car broke down Wed, so I've spent the long weekend mostly at home. I did bundle up and walk to the quilt shop Friday (about 2 miles each way) to buy some yellows. I just realized that I need to make something for a Christmas gift to go with a quilt I made for a family member a while ago. My yellow stash was looking slim.
But then I realized that I needed gold to finish a double wedding ring as well. So I abandoned the hand quilting and the huge TV in the living room. I found a place for a portable TV in my sewing space so I could still watch football while I pieced. Cut out some yellow pieces and got to work on a UFO.
Before noon on Sunday, I had the melons done and laid out to distribute the different fabrics from the red rings. When will I ever learn and pick out a pattern that doesn't require being strewn across the floor before it's put together?
Marley was confused why I was here and not in the living room.
Here's the half way point. But I am Soooo done with piecing for now.
I'm headed back to the couch.
I do have more pictures of this project on Celebrate Hand Quilting where I was soliciting suggestions for how to approach the background fill. Stop on over there if you aren't already a follower.
Saturday, November 24, 2012
Needles Matter
In the big scheme of things, these stitches are all small. I was frustrated that I had snapped a small needle so I changed needles for the 3 magenta lines on the right, I used a Roxanne 11 which feels like every other brand 10 to me. I found the tip to be relatively dull and took a lot of pressure to push it through. Please note that there's variation in stitch length on all 3 lines. I am stitching through a batik applique on the front, silk batting and an Ikea cotton sheet on the back (the side of this photo)
In contrast, the 2 lines of stitching on the left are using the same Aurifil thread, but a Piecemakers #12 needle. Not only are they more consistent in size, but the stitch count dropped from 14 to 16 stitches per inch. (In sections without the applique, stiches with the 12 needles vary 16-18/inch)
I know it seems a bit OCD...but even stitches are worth a change in needle for me.
Tuesday, November 13, 2012
WIPs on Wed Nov 14
I survived the mixed-method trapunto experiment...but did manage to break about 5 needles. Which is weird since I can't even remember the last time I ever broke a needle while hand stitching.
Normally I have a stash of needles since I'm forever losing them.
I had to run to the LQS to replenish the stock. I have to say I'm not too happy. The Piecemaker's 12's are lovely to sew with, but the glazed quilting threads are too thick to fit through the eye. The Clover big eye 12's are nice, but really what I would consider an 11. I was excited to try the Roxanne 11's - cute case, but quite the price since there are 50. I had all kinds of bad words to say once I started using them as they are what I would consider a chubby 10. Seriously now...what's the point of a numbering system if it differs by brand???
I am very pleased with this center motif. It is pieces and parts of Ester's Heart's Desire. Actually, I think it's all from the same outer border. The big flowers were in the center of each side and the 3 petaled flowers were draped over the basket handle. Fill is just straight(ish) lines 3/8" apart.
I re-hooped to the section of leaves closest to the center. It will also look familiar to many of you who know her design since it was block 2 of the quilt along.
This was me pondering how closely I really need to quilt everything to be happy.
I'm afraid that the correct answer is "very, very close".
The additional veining in dark green and curley-q's in pale green make me very happy. I stitched the flower buds in magenta. Funny how those details will be completely lost to anyone standing more than a foot away. But still, I smile.
Labels:
Applique,
Batik,
Esther Aliu,
Hand Quilting,
Trapunto
Sunday, November 4, 2012
Quilting Again
I spent Saturday morning doing my least favorite quilt related task. I sandwiched and basted a quilt for hand quilting. That involves moving furniture and sitting on the floor for ages, making giant basting stitches to hold everything together.
This is the project for which I used the machine trapunto technique of basting the extra layer of batting in place using FMQ with a wash-away thread on top. I posted about this technique on Celebrate Hand Quilting a couple weeks ago.
Unfortunately, I had used a new marking pencil that mostly brushed off during the FMQ process.
That tends to be a problem because I am not very good / accurate with FMQ so my basted flowers are all wonky. I spent the day trying to reshape flowers as I stitched.
All things considered, it's turning out pretty well. And I'm starting to actually enjoy the fact that my floral motif is a little organic and not as symmetrical as it was planned.
This final photo really illustrates bad basting turning into nice quilting.
Labels:
Esther Aliu,
Free Motion Quilting,
Hand Quilting,
Trapunto
Subscribe to:
Comments (Atom)


